2018年1月6日星期六

Configure MAC addresses for Hyper-v

Each physical network adapter has a Media Access Control (MAC) address (sometimes called a hardware address), that is unique identifier of the device on the network. The same is true of virtual network adapters.

Hyper-v has a pool of address and assign them as you create virtual network adapter.

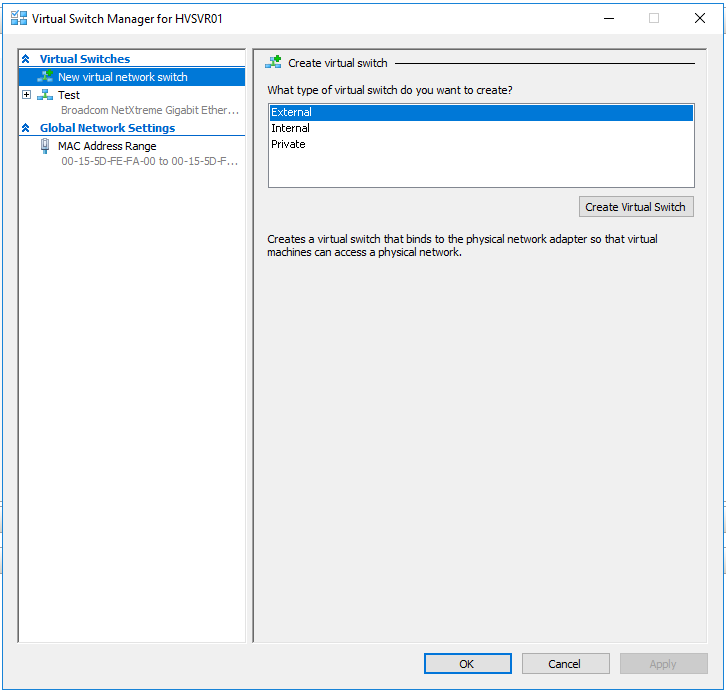
To view or modify the MAC address pool for the Hyper-v server, open Virtual Switch Manager and select MAC Address Range under Global Network Settings.


The Hyper-v MAC address has the following sections:
Byte 1 to 3: OO-15-5D,which is an OUI registered by Microsoft.
Byte 4 and 5: Consists of the last two bytes of the IP address assigned to the server’s physical network adapter, converted to hexadecimal notation.
Byte 6: from 00 to FF, which provides 256 possible addresses

The default pool of 256 addresses is expected to be sufficient of most cases, if you need enlarge the address pool, you can modifying the second to last bytes as well increases the pool from 256 to 4,096 or more, as in the following range:
256 address pool: 00-15-5D-FE-FA-00 to 00-15-5D-FE-FA-FF
4096 address pool: 00-15-5D-FE-F0-00 to 00-15-5D-FE-FF-FF
65536 address pool: 00-15-5D-FE-00-00 to 00-15-5D-FE-FF-FF
More: … … … …

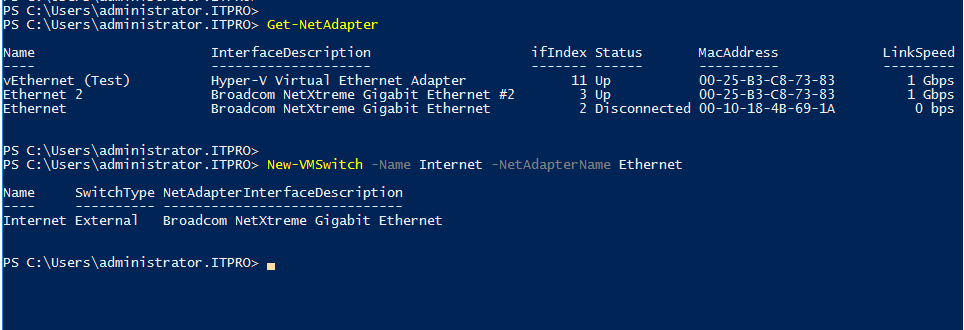
You can use Get-Host cmdlet on Windows PowerShell to view Mac address range.


You can use Set-Host cmdlet on Windows PowerShell to change Mac address range.


Virtual network adapters use dynamically assigned MAC addresses by default, but you can configure the virtual network adapters to use static MAC addresses.

Expand a network adapter in the Settings dialog box of a VM, access to the Advanced Feature page. On this page,you can configure MAC address of the Virtual Network Adapter:


You can use Set-VMNetworkAdapter cmdlet on Windows PowerShell to change MAC address of virtual network adapter.
VMName: Virtual machine name
StaticMACAddress: To use static MAC address

2018年1月3日星期三

Creating a new virtual switch for Hyper-v Server

When you install the Hyper-v role in the Add Roles And Features Wizard, you can create the Hyper-v Server's first virtual switches. If without a virtual switch, the virtual machine will unable to communicate with other.

Open Hyper-v Manager, Select Hyper-v Server you want to creat virtual switch. Then right-click it and select Virtual Switch Manager or select Virtual Switch Manager in the Actions pane.


Select the following switch types, and click Create Virtual Switch:
External: The virtual switch is bound to networking protocol stack in the host operating system and connected to a physical network adapter. Ability to communicate with the physical network.
Internal: Bound to a separate instance of the networking protocol stack in the host operating system, independent from the physical network interface adapter and its connected network. The Hyper-v host operating system can access the physical network through the physical network interface adapter, but the virtual machines cannot access the physical network through the physical adapter.
Private: A private virtual switch can only be accessed by a virtual machine running on a hyper-v host.


Type a name for the new virtual switch in the name text box.
If Select an External Network, you also need select the physical network adapter to which the virtual switch will be bound. And need configure the following option:
Allow Management Operating System To Share This Network Adapter: Selected by default when you create an external virtual switch, clearing this check box the host operating system will not be able to use this physical network adapter.
Enable Single Root I/O Virtualization (SR-IOV): Allows you to create an external virtual switch associated with a physical network adapter that supports SR-IOV. This option is only available when creating a new virtual switch; you cannot change an existing virtual switch's this option.
Enable Virtual LAN Identification For Management Operating System: If your environment uses VLANs, you also need to select this check box and configure the VLAN identifier.
Then click OK.


Each physical network adapter can only create one virtual switch, but you can create multiple internal or private virtual switches.

You can use the New-VMSwitch cmdlet on Windows PowerShell to create a new virtual switch.
Name: Virtual Switch Name
NetAdapterName: The name of the network adapter to which the virtual switch is bound.
If don't know the name of the network adapter, you can use Get-NetAdapter cmdlet on Windows PowerShell to see.


Create a new Private or Internal virtual switch.
Name: Virtual Switch Name
SwitchType: The type of virtual switch; Private or Internal.

2017年12月16日星期六

Add and remove virtual network interface cards for Hyper-v virtual machine

Same as in a physical machine, a virtual machine can have multiple network interface adapters, providing connections to different networks or for carrying different types of traffic. When you create a new virtual machine, the default includes one virtual network adapter.

Open Hyper-v Manager, select Hyper-v Server. Then right-click a virtual machine you want add virtual network interface card, and select setting.


Select Network Adapter On the Add Hardware page, and click Add.


On the Network Adapter page,  in the Virtual Switch drop-down list, select the switch to which you want to connect the network adapter.
If your network uses VLANs, you can select Enable Virtual LAN Identification check box and type a VLAN identifier.
Then click OK.


You can use Remove in the Network Adapter page to delete Network Adapter.

You can use Add-VMNetworkAdapter cmdlet on Windows PowerShell to create a virtual network adapter.
VMNane: Virtual Machine name
SwitchName: The name of the virtual switch to connect to the network adapter.
Name: Network adapter name


You can use Remove-VMNetworkAdapter cmdlet on Windows PowerShell to remove a virtual network adapter.


Note: Generation 1 virtual machine add or remove virtual network adapter need shut down virtual machine.

Manage Hyper-v checkpoints

Checkpoints ( formerly snapshots ) are files that save the state of the virtual machine. Create a checkpoint, you can quickly restore the virtual machine to a specific point in time. 

Creating a checkpoint
Open Hyper-v Manager, Select Hyper-v Server, then right-click a virtual machine you want to creating a checkpoint,and select Checkpoint.


Applying a checkpoint
The applying a checkpoint is return the virtual machine to its previous state(The status of the checkpoint).
Open Hyper-v Manager,select a virtual machine you want to return state, right-click the checkpoint in Checkpoints pane and select Apply.


You can choose from the following options:
Apply: Apply the selected checkpoint,and Overwrite the existing state of the virtual machine.
Create Checkpoint And Apply: Creating a new checkpoint of the virtual machine to save its existing state. Then apply the selected checkpoint.


Rename checkpoint
You can right-click checkpoint, and select Rename to rename the checkpoint.

Delete checkpoint
You can right-click checkpoint, and select Delete Checkpoint or Delete Checkpoint Subtree to delete checkpoint or checkpoint subtree.

You can use Checkpoint-VM cmdlet on Windows PowerShell to create a virtual machine checkpoint.
Name: Virtual Name
SnapshotName: Snapshot Name


You can use Restore-VMSnapshot cmdlet on Windows PowerShell to restore virtual machine state.
Name: Snapshot Name
VMName: Virtual Name


You can use Get-VMSnapshot cmdlet on Windows PowerShell to view the virtual machine checkpoint.
VMName: Virtual Name


Production Checkpoint
Before Windows Server 2016,Microsoft to strongly recommend checkpoint not be used on production VMs.

Because, a checkpoint saved state of the Virtual machine,not the virtual machine itself.

Windows Server 2016 include a product checkpoint feature, which use the Volume Shadow Copy Service in Windows,or File System Freeze in Linux,to create a snapshot of the data from a virtual machine,without saving its state.

The use of production checkpoints is the default on all Windows Server 2016 VMs

You can open VM's Settings dialog box in Hyper-V Manager to the Checkpoints page, select Production checkpoint or Standard checkpoint option.


You can also this page to specify the location for the checkpoint files from the virtual machine, and disable checkpoint.

Note: The way the two checkpoints are not the same, you need to select the appropriate checkpoint according to the actual situation.

You can use the Set-VM cmdlet in Windows PowerShell to change the checkpoint default 

2017年11月25日星期六

Configure Storage Quality of Service (QoS)

If multiple virtual disks stored on a single physical disk, these virtual machines running simultaneously and accessing their virtual disks from the same physical disk,one virtual disk possible monopolize the physical disk's I/O,causing the other virtual disks to slow down. To help prevent this,you can control the Quality of Service(QoS)for a virtual hard disk.

You can open the Settings dialog box for a virtual machine in Hyper-V Manager, expand a hard drive component, select Quality Of Service, and select the Enable Quality Of Service Management check box on the Quality Of Service page. Now, you can specify minimum and maximum IOPS values for the virtual disk.


Note: Minimum and maximum IOPS are measured in 8 KB increments.

You can use the Set-VMHardDiskDrive cmdlet on Windows PowerShell to configure these setting.
VMName: virtual machine name
ControllerType: virtual hard disk controller type
ControllerNumber:  virtual hard disk controller number, Starting from 0


Resize a virtual hard disk for Hyper-v Server

Open the Hyper-v Manager, right-click Hyper-v Server and select Edit Disk; or in the Actions pane,select Edit Disk.


Click Next


Click Browse to select the virtual disk you want to change, then click Next.


Select the action you want to perform. You can do the following:
Compact: Reduces the size of a dynamically expanding or differencing disk by deleting empty space, while leaving the disk’s capacity unchanged.
Note: After the file is delete in the dynamic hard disk, the size of the hard disk file will not chang. For example,a dynamic hard disk file has 20GB, I copied a 10GB file to the hard disk, this moment the size of the hard disk file is 30GB, when I delete the 10GB file in this hard disk, the hard disk file size still 30GB. At this point you need to use Compact.
Convert: Creates a copy of the disk image file, enabling you to change the format (VHD or VHDX) or the type (fixed size or dynamically expanding) in the process.
Expand: Increases the capacity of the disk. 
Shrink: Reduces the capacity of the disk by deleting empty storage space from the file. The option only appears when there is unpartitioned space available at the end of the virtual disk.
Note: When the virtual machine is running only Expand and shrink options are available.
Merge: combine the data on the differencing disk and its parent disk to form a new file. The option only appear when you select a Differencing disk.
In this example, I chose Expand. Then click Next.


Type new virtual disk size in the New Size text box. Then click Next.


Click Finish


You can use the Optimize-VHD cmdlet on Windows PowerShell to compact a virtual hard disk file.


You can use the Convert-VHD cmdlet on Windows PowerShell to convert a virtual hard disk file. Form a VHD file to a VHDX file, from a fixed size file to a dynamic file or from a fixed size VHD file to a dynamic VHDX file.


You can use the Resize-VHD cmdlet on Windows PowerShell to expand or shrink a virtual hard disk size.


You can use the Merge-VHD cmdlet on Windows PowerShell to merge a differencing disk into its parent disk.

Adding virtual disks to virtual machines for Hyper-v Server

On Hyper-V Manager, right-click a virtual machine of you want to add virtual disk and select setting.


Select IDE Controller 0, one the IDE Controller page, select Hard Drive, and click Add.
Note: Generation 2 is  SCSI Controller.


You can select New to open a New Virtual Hard Disk Wizard or select Browse to add a existing virtual disk.
Then click OK.


Note: Generation 1 virtual machines need to be shut down to add virtual disks