2017年11月18日星期六

Creating virtual disk in the Hyper-V Server

Understanding virtual disk formats
Windows Server 2016 Hyper-V supports two kinds ofVirtual Disk:VHD and VHDX.

VHD

  • Maximum support to 2TB
  • Compatible with all versions of hyper-v

VHDX
  • Only support Windows Server 2012 R2 or later and Windows 8.1 or later
  • Maximum support to 64TB
  • Support 4KB logical sector
  • larger block(Up to 256 MB)


Creating a Virtual Disk
Windows Server 2016 Hyper-V provides several ways to create virtual disk files. You can create them while create a new Virtual Machine. Or you can also create them using the New Virtual Disk Wizard. Or you can create them using Windows PowerShell.

Creating a new virtual disk in Hyper-V Manager
Open Hyper-v Manager, Right-click the Hyper-v Server,Select New | Hard Disk. Or from the Action menu,select New | Hard Disk.


Click Next


Select one of the following disk format options:
VHD: Create a virtual hard disk with less than 2TB and highly compatibility
VHDX: Create a virtual hard disk with greater than 2TB
VHD Set: It's a share Virtual Hard Disk. You can share virtual disk files between multiple virtual machines. Used for failover clustering.
Then Click Next


Select one of the following disk type options:
Fixed Size:The Virtual Hard Disk file size is the same as the Virtual Hard Disk space size. Such as, a Virtual Hard Desk size is 50G,the VHD or VHDX file size is 50G.
Dynamically Expanding: Virtual hard disk file starts small, with more and more data written, virtual hard disk file is also growing, until it reaches the size of the virtual hard disk space.
Differencing: It is a child virtual hard disk file that is associated with a specific parent virtual hard disk file. All system changes will be written to the child virtual hard disk file.
Then Click Next.


Note
It is recommended to use the Fixed Size in production environment. While the Fixed Size allocates all size all at once, waste of disk space, but it provides the best performance.
The Dynamically Expanding while saving space, but their continued growth will have an impact on performance,and also Over-allocation physical disk space.
The Differencing is more suitable for scenes that require frequent return to a certain state of the system.

But it is useful to have Dynamically Expanding and Differencing in test environments


Specify a filename for the Virtual Hard Disk in the Name text box,If necessary, Specify a Non-default location for the file.


Select and configuration one of the following options:
Create A New Blank Virtual Hard Disk: Create a new Virtual Hard Disk and specifie the size.
Copy The Contents Of The Specified Physical Disk: Select one of the physical hard disk in the computer and copy its contents to the new Virtual Hard Disk.
Copy The Contents Of The Specified Virtual Hard Disk: Select an existing Virtual Hard Disk file and copy its contents to the new Virtual Hard Disk.
Then Click Next


Click Finish


Creating a new virtual disk using Windows PowerShell
You can create a new virtual hard disk files using New-VHD cmdlet in Windows PowerShell
Path: The store path of the Virtual Hard Disk
Test.VHDX: The Name and format of the Virtual Hard Disk. The extension name you specify for the filename determines the format(VHD or VHDX) of the virtual disk.
Dynamic: Create a dynamic extended virtual disk.You can use Fixed and Differentiating to create a virtual disk of Fixed size or difference.
SizeByts:Specify size of Virtual Hard Disk 


You can also specify block and logical sector size using BlockSizeBytes and LogicalSectorSizeBytes parameters


2017年11月9日星期四

The virtual machine configuration is not compatible while importing the virtual machine in Hyper-v server

The following error occurred while importing the virtual machine:
Unable to import virtual machine due to configuration errors.  Please use Compare-VM to repair the virtual machine.


This issue is due to the configuration of the virtual machine is not compatible with the existing Hyper-V host.

Solution:
Get a compatibility report for this virtual machine.


Displays the compatibility report.  the virtual network adapter was connected to switch RDS Natwork, but the Hyper-V host has no switch by that name.


Disconnects the virtual network adapter.


Review the compatibility report again to determine whether the virtual machine is compatible with the hyper-v host.


Import the Virtual Machine.
You can also add parameters to define the imported virtual machine.
 Such as, you can add -Copy and -GenerateNewId parameters, copying the Virtual Machine's files to the default virtual machine and virtual hard drive storage locations of the Hyper-V host, and generate a new Virtual Machine ID.


Export and import VMs in Hyper-v Server

Importing and exporting virtual machines in hyper-v is a way to move virtual machines to other servers.

When you export a VM, You need to specify a path. The system will create a copy of all the files of the virtual machine to this path, including configuration files, virtual hard disk and checkpoint. Ceckpoint also call snapshot. You can export a Virtual Machine while it is running or stopped.

Export Virtual Machine using Hyper-v Manager
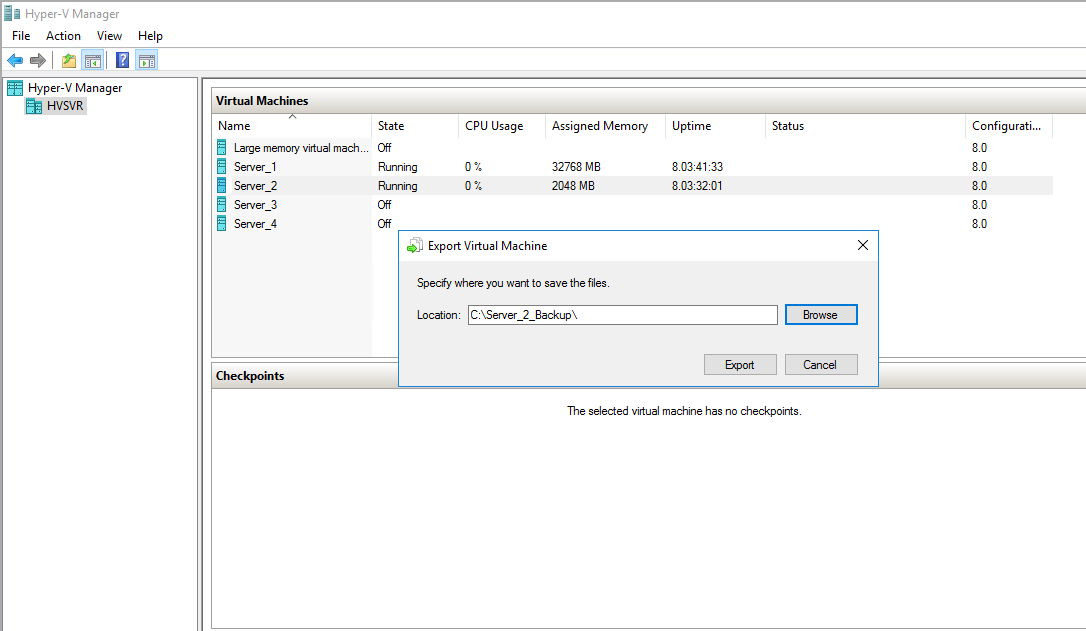
Open Hyper-v Manager, Right-Click the Virtual Machine you want to export, and select Export.


Specify a location store Virtual Machine files and click Export


You can see the Virtual Machine Export progress in the status bar


When exporting a virtual machine, you can select Cancel Exporting in the Action pane cancel the export


You can also export Virtual Machine using Export-VM cmdlet in Windows PowerShell
Name: VM's Name
Path: Path of VM export


Import Virtual Machine using Hyper-V Manager
Open Hyper-v Manager, Select Import Virtual Machine in Action pane.


Click Next


Browse to the folder containing the exported files.


Click Next


Chose you want to import VM's type:
  • Register The Virtual Machine In Place: Store the exported file where you want and register the virtual machine on the Hyper-V server with the same virtual machine ID.
  • Restore The Virtual Machine: Assuming your exported files that are stored in a removable storage, you can choose this option to move the files to the right place,then register the virtual machine on the Hyper-V server with the same virtual machine ID.
  • Copy The Virtual Machine: If you want to import this virtual machine many times, for example, you want to use this virtual machine as a template, you can choose this option. Copy the virtual machine to the right place, and generate a new ID, then register this virtual machine.
I select Copy The Virtual Machine in here. Then click Next.


Specify the store location of the configuration file, checkpoint file, and smart page file of the virtual machine. Then click Next


Specify the store location of the Virtual Hard Disk


Click Finish


When Exported Virtual machine is saved state,you need to delete the saved state to run the virtual machine.
Right-Click the Virtual Machine,Select Delete Saved State.


Click Delete


When the names of the virtual switches on two Hyper-V hosts do not match, you will get an error like a following.
Solution:Select the available virtual switch in the connection option


You can also import Virtual Machine using Import-VM cmdlet in Windows PowerShell
Copy: Copying the Virtual Machine's files to the default virtual machine and virtual hard drive storage locations of the Hyper-V host.
GenerateNewId: Generate a new Virtual Machine ID


Note: When importing a virtual machine, you need to enter the full path of the virtual machine's configuration file.

If you want to import the Virtual Machine from it's configuration file, and the Virtual Machine is registered in-place. You can use following command:
Import-VM -Path 'the full path to the virtual machine's configuration file' -Register

To specify different locations for the copied files, you can add the following parameters to the command line:
  • VirtualMachinePath
  • VhdDestinationPath
  • SnapshotFilePath
  • SmartPagingFilePath

2017年11月7日星期二

Enable Hyper-v implement enhanced session mode

Enhanced session mode is a feature of Hyper-V that allow you use a computer's local resources in a virtual machine,For example, with enhanced session mode enabled, a VM can send print jobs to the host system’s printer, log on using its smart card reader, share clipboard data, play or record audio, adjust the screen resolution, or access the host's drives.

You can use the following local resources if they're available:
  • Audio
  • Printers
  • Clipboards for copy and paste
  • Smart cards
  • USB devices
  • Local Drives
  • Supported plug and play devices


system requirement:

  • The Hyper-v host system must be running Windows Server 2016, Windows Server 2012 R2, Windows Server 2012, Windows 10, Windows 8.1, or Windows 8.
  • The VM must be running Windows Server 2016, Windows Server 2012 R2, Windows 10, or Windows 8.1,and Remote Desktop must be enabled in the System Properties.

In Windows Server 2016, enhanced session mode is disabled by default. To use it, you must enable it in the Hyper-V Settings dialog box. You need change two places.
In the Server section,on the Enhanced Session Mode Policy page, select the Allow Enhanced Session Mode check box。


In the User section, on the Enhanced Session Mode page, select the Use Enhanced Session Mode check box.


After enable enhanced session mode,When you connect to a virtual machine,an extra Connect dialog box will pop up. In this dialog box, you can set the virtual machine resolution.


When you click Show Options, then select the Local Resources tab.  


Click more to see more available resources.

Hyper-v Generation 1 and 2 VM's usage scenarios

In the New Virtual Machine wizard, you can choose to create a Generation 1 or Generation 2 virtual machine.


Select to create a generation 1 or generation 2 virtual machine will depend on which guest operating system you want to install and the boot method you want to use to deploy the virtual machine.

Microsoft recommends create a generation 2 virtual machine to take advantage of new features such as Secure Boot, Unless the following circumstances must use the generation 1 virtual machines:
  • You plan to move your virtual machine to Azure:Azure does not currently support create a generation 2 virtual machines
  • The generation 2 virtual machine does not support the operating system you want to install:generation 2 virtual machine only support Windows Server 2012 or later and Windows 8 or later 64 bit editions's operating system. Only some new versions of Linux are supported. All FreeBSD don't aer support.
  • There is a previous version of the hyper-v host system in the hyper-v cluster:In previous versions of Hyper-V, there was only one generation of virtual machine. Fail when migrating virtual machine

Can I convert generation 1 VMs to generation 2 VMs?
Yes, you can convert generation 1 VMs to generation 2 VMs,but you need to be aware that there may be risks, and before converting, back up the data.

2017年11月1日星期三

Manage Integration Services for Hyper-v

Integration Services is a software package that runs on a guest operating system, it is allow the virtual machine to communicate with the Hyper-V host, and it can improves integration between the host server and the virtual machine. The administrator can turn it enable or disable as needed.

You can to the selected  available components of the integrated service on the virtual machine. Select the Integration Services page in the VM Settings dialog box, then select or clear the check boxes.


Windows Server 2016 has six Integration Services components, all of which are enabled by default, except for Guest Services. The functions of the components are as follows:
Operating system shutdown:Enables administrators to perform shutdown of a VM without having to log on to it.
Time synchronization:Synchronize the clock on the virtual machine with the clock on the Hyper-v host.
Data exchange:Also known as key-value pair (KVP), that enables the guest operating system on a VM to share information with the Hyper-V host server operating system using the VMBus.
Heartbeat:Tell the Hyper-V host that the virtual machine has installed the operating system and started normally. The current state of the heartbeat signal is displayed on the Summary tab of a VM in Hyper-V Manager
Backup (volume shadow copy):Enables administrators to back up a VM using backup software running on the host server. This type of backup includes the VM configuration, the virtual hard disks, and any checkpoints. The volumes on the VM must use the NTFS file system and have volume shadow copy enabled.
Guest services:Enables administrators to copy files to and from a running VM using the VMBus instead of a network connection. To copy files this way, you must use the Copy-VMFile PowerShell cmdlet. 

Configure resource metering for Hyper-v

Hyper-v As an important component of the cloud platform, resource metering is a very important feature, you can track the virtual machine is using the resources.

Enable resource metering use Windows PowerShell


You can tracks usage of the following resources:
CPU:Specifies the VM processor average utilization in megahertz (MHz)。The statistic remains valid, even when the VM is moved to another host server.
Memory:Tracks the minimum, maximum, and average allocated memory, measured in megabytes (MB).
Disk:Maximum amount of disk space allocated to a virtual machine,and the space consumed on the host by any snapshots.
Network:Specifies the total incoming and outgoing network traffic of the VM, in megabytes.

To display the resource metering statistics for a specific VM, use the measure-vm cmdlet


If you want to see the utilization in greater detail
To set the resource metering statistics back to zero, use the Reset-VMResourceMetering cmdlet


To turn resource metering off for a VM, use the Disable-VMResourceMetering cmdlet